Friday, December 16, 2016

Merry and Bright: A 12 x 12 Scrapbook Layout


Last year was my niece Riley's first Christmas. Her and my nephew had some adorable Christmas pictures made together. I finally got around to scrapping a few of them. 

The background paper is just a piece from a paper pad that I bought at Michael's. The paper that I cut the banner strips from is an Illustrated Faith paper from their newest Christmas release from this year. 

The "Merry and Bright" is a card from a Simple Stories Christmas collection from a few years back. It was the perfect title for this layout and it was an easy option as well. 

I added this beautiful gold stitching around the layout in three different places. I love the added sparkle and texture. 

I stamped the date on this layout using the awesome Dated Stamp Set from Elle's Studio. I've been wanting the Mega Date Stamp from Studio Calico for some time now but I can never catch it when it's in stock. This stamp set will work exactly the way that date stamp would have. 

Tuesday, December 13, 2016

My Heart: A 12 x 12 Scrapbook Layout


Do you use mixed media on your scrapbook pages? I don't use it often but I love the way it looks when I do. 


I used my watercolor paints on the background of this layout. I just made the colors I wanted to use, placed the paint on a piece of plastic packaging and "smooshed" the color on my paper.  I repeated that process until I was satisfied with the way the paint looked. I also used some mists and paint to make splatters around my layout. 


All of the bits and pieces that you see scattered around the layout are from Elle's Studio. I bought a few of Elle's grab bags that she had on sale on Black Friday. Her grab bags are awesome and so very cheap.


The blue letters that spell "Ethan" are from Pinkfresh Studio and are their Indigo Puffy Alpha Stickers. I used my Tim Holtz tiny attacher to add some extra detail. I also did my journaling right above those alphas. 

The black word 'my' and the stars and hearts around the layout are from the Dear Lizzy  Hello Thickers. 


The star stamp that is seen around the layout is from Felicity Jane stamp set called Emeline. I used my Wink of Stella clear glitter pen to give them some sparkle as well. 

I finished off my layout with some black doodling around the edges and some enamel dots. 

I hope this layout will inspire you to break out those mixed media products and create something unique and beautiful.

Monday, December 12, 2016

Snapchat is his fave: An 11 x 8.5 Scrapbook Layout

Yes, me and Snapchat again!!  I just can't help it--the filters are just so much fun. And then there is my 8 year old nephew who thinks Snapchat is hilarious!! He's at the age where he doesn't want me to take his picture, but he's always ready to play on Snapchat. 


I've never done a layout in this orientation before but I have to say it was a lot of fun. All of the papers and most of the bits and pieces are from the Bella Blvd. collection called Alex. 


I added some hand stitching in a few places around the layout just to add some texture and interest. I love the look of stitching on paper projects.  


I love all of these word stickers and die cuts that I found on the sticker sheets of the Alex and Addison collections from Bella Blvd. I thought they added just the right touch above my strip of photos. 


My title was created using some really old Making Memories stickers and Dear Lizzy Snapshot Thickers. The star chipboard is from Pinkfresh Studio and I added in some enamel dots. The star stamp and the "Now What" stamp are from the Emeline  stamp set from Felicity Jane. 

Break out those funny and silly pictures and record those moments. 

Sunday, December 11, 2016

Just Wonderful: A 12 x 12 Scrapbook Layout

What is your favorite season? I love fall. I love the beautiful changing leaves, the cooler temperatures, Thanksgiving and all things pumpkin. Do you know another great thing about fall? Most of the time I can still wear my flip flops! (Flip flops are my favorite shoes!!)

This layout documents just that--wearing my oh so comfy flip flops in the fall. I used a cut file on this layout from the Just Nick store. That store has some awesome cut files that you should check out. The cut file was all one piece, but I cut it up so I could use it in several places on my layout. I used water color, markers and some spray mists on my leaves and greenery. I also backed them with patterned paper.

I mainly used the new fall collection from Simple Stories called Hello Fall. 


The word wonderful that I used in my title is a chipboard piece with a gold coating from Studio Calico.

I love the dimension that the cut file leaves give my layout. I layered in some other leaves and some flowers and brads from Hello Fall as well.

I hope you enjoyed this layout and that it inspires you to scrapbook a layout about your favorite season.


Thursday, November 10, 2016

Halloween: A 12 x 12 Scrapbook Layout

Do you and your family celebrate Halloween? 

I've always loved the fun side of Halloween, not the spooky, creepy side. I loved dressing up as a kid and going trick-or-treating. I'll skip the haunted house though. 

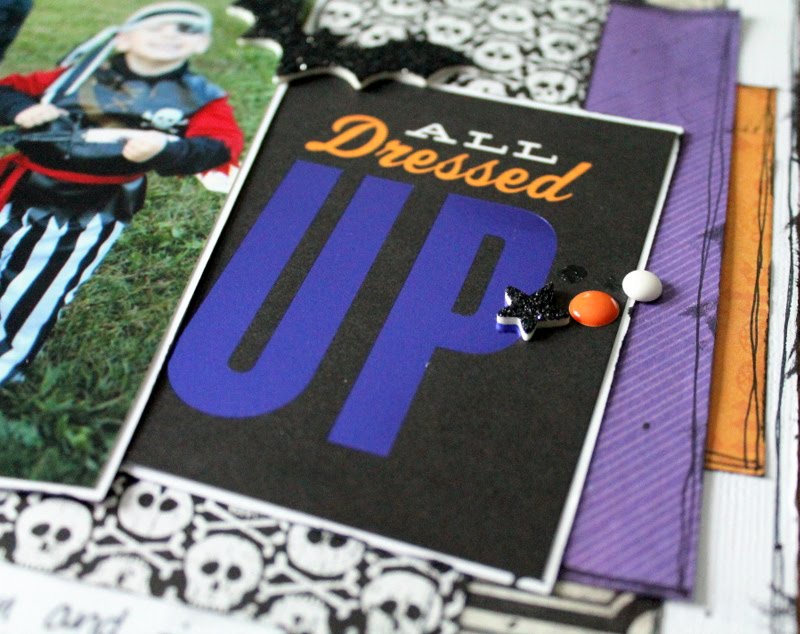
I recently purchased a package of  those glitter Thicker  words like the one that spells out "Halloween" on this layout and they inspired me to dig out some Halloween pictures. This photo of my boys is from 2008. They were so cute and adorable in their costumes. 

I don't have a big stash of Halloween themed papers or embellishments so most of the items on my layout have been around for a long time. The strip of paper on the left is from a 2008 collection by Imaginisce called Eeks and Shrieks. The photo mat in the very back is from Me and My Big Ideas and the skull paper is from The Paper Studio, found at Hobby Lobby and it's called Skull and Crossbones. The purple patterned paper has been in my scrap bin for a long time and I'm not sure who made it. The orange paper is just the back side of the Imaginisce paper that I mentioned before. 


I used a Me and My Big Ideas project life style card to add beside the photo. Although it's hard to see in the photos, the word "up" is purple foil. The word label stickers above the title are from Me and My Big Ideas as well. The foam glitter stars and the bat came from the same Thickers pack as the title. 
I used a Heidi Swapp stamp to add some extra embellishing in the top and bottom corners. The washi tape seen on the layout is just from my stash. Along with some Black Velvet Heidi Swapp Color Shine, some ink and doodling on the edges of the layout, I also added a few enamel dots in various colors. 


No matter how old your scrapbooking supplies are, get them out and use them. Get those memories documented. 


Wednesday, November 9, 2016

Make A Wish: A 12 x 12 Scrapbook Layout

Have you ever used a gelli plate? What did you do with the prints you made?


I recently purchased a gelli plate and I love the prints I've made so far. I made some using black, pink, purple and teal paint, with a specific goal in mind. I wanted to use them on a layout about my niece's first birthday. 


On this layout, I used the gelli prints under my photos and for the fringe on the right side of the layout. 

For most of the goodies on this layout, I used the new collection from Cocoa Vanilla Studios called Make-A-Wish.  The pink patterned paper along with the embellishments that are placed on each photo are from that collection. The embellishment cluster at the top of the page contains more pieces from that collection along with some clear stickers from Me and My Big Ideas. The Make-A-Wish collection has some adorable puffy stickers and a bits and pieces type embellishment pack. 

I made my title using a stamp from Studio Calico and I colored it using some Zig Clean Color Brush Markers. Layered under my title are more of those bits and pieces from Cocoa Vanilla Studios.  

I finished up the layout by adding some enamel dots and some clear sequins that I picked up at my local Michael's store. 


If you ever get the chance to play with a gelli plate, do it. It's so much fun and you can make awesome prints to use in scrapbooking, art journaling, card making, etc. Check out YouTube for some awesome gelli printing videos as well. 

Monday, October 31, 2016

Snaps with dad: A 12 x 12 Layout

What kind of fun, social media apps do you use? Have you ever tried Snapchat?

I really don't use Snapchat for the social media aspect. I just love taking pictures with the fun filters. A few months back, my sister and I took some pictures with my dad after a Father's Day breakfast. We did some 'normal' pictures and then took a few using Snapchat. My dad thought the ones using Snapchat were hilarious. I can still see him laughing at the pictures.

Mind you, my dad is almost sixty and his version of a 'smart phone' is a Trac phone from Wal-Mart. He really has no clue about modern technology and such, so he thinks this 'new-fangled' stuff that my sister and I can do via our phones, is awesome. 


Several weeks later, my dad and I were out and about by ourselves. Before dropping him off at home, I suggested we take some pictures using Snapchat. So these adorable pictures happened and I knew I needed to document them. 


All of these patterned papers have been in my scrappy stash for a long time. I've been on a mission to try to use up all these older scraps of paper. 


I've had those speech bubbles forever as well. They were a free printable that I found online and I just printed and cut them out. I thought the speech bubbles were a nice touch to this layout and relayed some fun sentiments. I also printed out the Snapchat logo and added it to one of the bubbles. I carried the papers and speech bubbles down to the lower right corner of the layout as well. 

The title is composed of some old Thickers and some alphas from Studio Calico. I used a few small puffy stickers from Amy Tangerine as well as some Me and My Big Ideas Chipboard. Finishing off the layout are some word label stickers by Tim Holtz, enamel dots and some mists from Heidi Swapp in black and teal. 

Take some funny pictures of yourself and your family and document them. Just think how much fun it will be to look back on those silly photos in years to come.